In the prior article, Enterprise Process Map (Part 1 of 2), I promoted enterprise process maps as a tool to enhance operational clarity and create a shared view of a company’s capabilities. It is this shared perspective that accelerates business planning and improvement activities as the time to get everyone on the same page is vastly reduced. In lieu of such a foundational view, leaders setting strategy are essentially planning a road trip without awareness of the roads to the destination.
In contrast to its rather simplistic appearance, an enterprise process map’s creation can be an arduous undertaking. Building a process map forces leaders to delve into the often-ambiguous operational boundaries in their company. Politics and knowledge gaps are to be expected. But upon completion, the result is worth the discomfort. An enterprise process map defines the complete customer relationship and clearly delineates how the company creates value.
Whether the goal is a process map for an enterprise or simply a business unit, our team has boiled the approach down to four steps.
Step 1: Leadership Interviews– You need information on how things get done. Begin by speaking with the leaders and managers of the major areas of the company. Generally, aim for individuals at the Vice President or departmental leader level. The aim of these interviews is to gain an understanding into all corners of the company. To collect this information, ask each leader these questions.
- When does your team interact with the customer?
- What are the major activities of your team?
- What are the outputs your team produces?
- What are the inputs to building these deliverables?
- Who are your business partners?
Generally when asking about the major activities, a collection of processes are named. For example, if you meet with a Supply Chain Vice President, you will probably get a list along these lines:
- Receive product from manufacturing
- Receive orders from sales
- Pick orders out of warehouse
- Stage orders for delivery
- Plan transportation routes
- Load orders onto trucks
- Deliver orders to customer locations
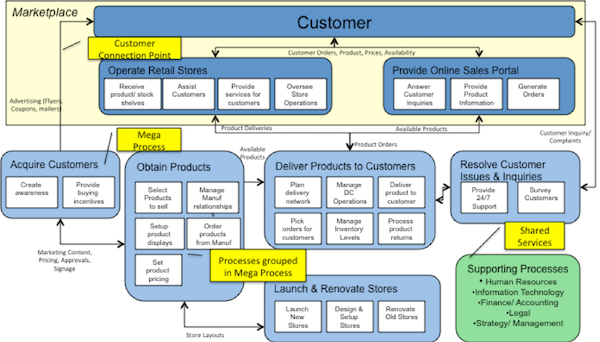
On an enterprise process map, it would make sense to merge these processes together and label them “Order Delivery” or something similar. “Order Delivery” in this example is a mega process that defines the collection of processes above. Listing the processes with the associated mega process adds further richness to the enterprise process map.
Figure 1: Enterprise Process Map for a Retail Company
Step 2: Initial Draft– Create an initial view of the enterprise process map.
- Start with the customer. Draw a box to represent the customer at the top of the page. Draw multiple boxes if there exist more than one distinct paying customer group.
- Identify the intersection where the customer connects with the organization. Extrapolate beyond these touch points to the value delivered at each connection. Draw a box and label the activity that occurs. For example, “Resolve Customer Issues” could be the label of a process for a customer service connection point. These boxes represent the customer-facing processes. Don’t worry if you have a bunch of boxes. The numbers will be distilled at a later point.
At this point, the focus shifts to the production processes.
- From the interviews, take the identified mega processes and place them in order of their general occurrence.
- Identify the connection points between the mega processes and the customer facing processes. With the mega processes identified, note their linkage to the customer-facing processes. Draw a line to identify the flow of work products, decisions, or other information. Use a simple label to clarify what is transferred. For example, an order might be generated by a sales process and pushed to a manufacturing process for planning and execution. Write “order” to show the flow of this line from sales to manufacturing.
- Push support functions to a shared services area (Finance, Accounting, HR, Technology, Legal, Facilities, Real Estate, Treasury, etc.). While shared services are necessary for any organization, they serve a relatively similar function across organizations.
Step 3: Distribution and Feedback– Share the draft with associates of all levels of the company and ask for feedback. It is this melding of perspectives that drives the accuracy and authenticity of the end product. Follow up if they don’t respond in a timely fashion
Step 4: Confirmation Session– As feedback rolls in, questions and differences of opinions will always surface. In order to complete (and confirm) the process map, schedule a meeting to work through the outstanding questions and drive to a shared perspective. On occasion, disagreements will require further investigation as to what really occurs in the trenches of the company. Even after agreement is reached, continued iterations will be required to keep it up to date.
When building the enterprise process map, there are several general rules to follow that will increase its accuracy.
- Focus on the processes not the organizational structure. The goal is to build a view of company without functional boundaries
- Avoid departmental or business unit names. Similarly, do not put owner’s names on processes (at least not yet)
- Resist the temptation to jump to the future. Always build a current state process map before beginning to plan a future state. A future state created prior to understanding the current state invariably ignores critical operational elements.
The greatest benefits of enterprise process maps come from the clarity and shared perspective it delivers. Share it widely across all levels of your organization. Update it as the organization evolves. In this way, the clarity gained extends through the employee ranks and into the future.


